Showing posts with label XTS3000. Show all posts

Thursday, April 4, 2013

Re-housing a Motorola XTS3000

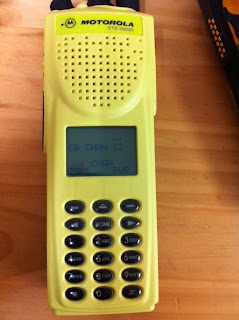
My new high-viz housing for the Motorola XTS3000 arrived today and I was straight into it.


Not a complicated task by any means but maybe a few tricks.....

You don't really need the special Motorola tool to get the housing off unless you are truly hamfisted. I used 2 flat blade precision screwdrivers and a circlips pliers with an angled attachment.


Just pop the two screwdrivers in between the radios metal body and the housing and gently angle them outwards till the tabs are visbile and free.


Using the circlips pliers in the other hand I gently prised the radio from the housing. Just be gentle and your case should not crack. Disconnect the radio from the controls connector that is inside the housing - just pulls off (but not by the ribbon cable).


Get the other housing ready, make sure the rubber gasket running around the radio is properly in place, you have reconnected the ribbon cable from the new housing to the radio, the keypad is in?


I forgot this one and had to pull it apart again. You can see the ribbon cable in the old housing above. Angle the radio in at the top and ensure it is seated up as far as it goes and then gently push the rest of the radio into the base. Watch out for the little switch board on the side of the radio foulding the radio chassis and also make sure the gasket doesn't sneak off as it goes in.

Check everything works.


....and this is the final product with the newer UHF/GPS antenna on board.


....and with the rest of the family to give a sense of scale (Alinco DJ-G5, Moto XTS3000, Moto Saber II)

There's a bit more detail on the disassembly from "Snarlingrabiddog5150" on Youtube who goes chasing an encryption board inside his XTS3000. Some of his other videos are also very informative if you check out his youtube channel.


Friday, March 29, 2013

Motorola 2M rig for the car.

....so after all that "fun" I had playing with the Motorola Saber IIs I seemed to be on the path to more Motorola ownership. The Kenwood TM241A I have been running in the car became problematic about 3 weeks ago with a dodgy screen (apparently a common fault).


This seemed like a good opportunity to pick up another mobile rig. A bit of perusing on EvilBay and I picked up a Motorola GM339, remote head for a good price. The radio arrived and as expected it had been used commercially in the mines (still programmed with their frequencies) but was in excellent condition.

Same story as before, you need to make sure you get the correct cables and software to program the radio correctly. This time the CPS (programming software) was not restricted to DOS or slow PCs. GUI was back baby. I first tried a serial ribless cable and to do this I used a USB to serial adaptor. This did not work and was a waste of time. Next I moved onto a USB Ribless cable (no need for a serial adaptor), this one would talk to the radio but I got errors about wrong versions. This is where I had to start looking for another version of the software - a little harder bit not impossible to find on the internet. Right cable, right software and we were in business.

Again, I read from the radio and saved the codeplug (radio config) before starting to change the settings. There are a lot more settings to change in this one compared to the Sabers.My main aim was to get it working so after clearing all of the previous channels I loaded in all of my local repeaters. I setup scan as well, the type of squelch, and any tones that were needed. I also customised the power settings so Low was 5 watts and High was 10 watts. A lot of the paging and id management I did not know what to do with so disabled as much as I could. When saving the new codeplug before writing it to the radio the CPS will advise of errors you have and not write till you fix them - this helped to ensure I had most of it right.


The install is pretty simple with the radio body in the glove box and the remote head mounted on top of another mount that is used for my VX-7R.


I even got my callsign to display on startup.


Scan doesn't work properly and I seem to have programmed the backlight timeout incorrectly.....will get to it eventually......have to be eventually as I also bought a Motorola XTS3000. It's a beater but has UHFCB already programmed in and I'll be rehousing it in the hi-viz housing the emergency services use. Will post when complete.